Indoor Lighting Guide
Power Supply Planning 101
When it comes to tape lighting with channels, selecting the power supply is step number three after you selected the appropriate tape lighting and supply leads and/or interconnects. Learn the ins and outs of how power supplies work, the importance of having a plan in place, and the tips and products you need to get started.
What is a Power Supply and Why do You Need it?
A power supply works to convert power from the wall or main electrical source (120V Residential, up to 277V in commercial environments) down to a level that can work with the low voltage light source at hand often 12V or 24V lighting.
Find the Right Power Supply for Your Project
To select a power supply, you must plan your project first and identify everything you need. This will help you see which power supply will work best for your project.
Step 1: Choose lighting from residential to commercial-grade, select the appropriate light source based on required output, voltage, and application.
Step 2: Determine load size consider the total combined feet (Tape Light) and/or number (Accent Disc) being utilized in your project, and what that equates to in watts.
Load Size (Tape Lighting) = Total Watts Per Foot x Total Combined Feet
Tip: If planning a tape light project that will use 12ft. of 6T120H30WH, multiply the watts/ft. (3W/ft.) by the total length needed (12ft.) 3x12=36, or 36 watts. This project will require a power supply with a wattage rating greater than 36W.
Load Size (Accent Disc) = Total Watts Per Disc x Total Number of Discs
Tip: If planning an accent disc project that requires 6 accents discs, multiply the watts of the disc (4W/disc) x the total number of discs (6) = 24W Total. This project will require a power supply with a wattage rating greater than 24W.
Step 3: Identify location & determine wire gauge where you want or need to place your power supply to best accommodate your project can factor into which power supply you choose. For instance, a remote island or china cabinet may work best with a low-watt Direct Wire Dimmable power supply tucked away nicely within to manage a smaller load without having to run and hide additional wiring to that location. When working on larger projects, it's important to think through whether a centralized Direct Wire Dimmable power supply placed above or within a cabinet is ideal. Or maybe leading back to the LED Driver + Dimmer installed in a nearby wall is better.
Wire Gauge & Voltage Drops - Where you decide to install the power supply can also potentially impact your wire gauge. Wire runs are relatively short in most cases, but if your only option is a long run, the Voltage Drop and Wire Gauge charts below can be your guide to determining what wire you will need. If possible, consider a location that could be most central to your project. This will help with those long runs while also getting the most from one power supply.
12V Voltage Drop & Wire Length Distance Chart
5W 0.42A | 10W 0.83A | 20W 1.67A | 30W 2.5A | 40W 3.33A | 50W 4.17A | 60W 5A | |
|---|---|---|---|---|---|---|---|
18 AWG | 65 ft. | 32 ft. | 16 ft. | 10 ft. | 8 ft. | 6 ft. | 5 ft. |
16 AWG | 100 ft. | 50 ft. | 25 ft. | 16 ft. | 12 ft. | 10 ft. | 8 ft. |
14 AWG | 160 ft. | 79 ft. | 39 ft. | 26 ft. | 20 ft. | 16 ft. | 13 ft. |
12 AWG | 240 ft. | 120 ft. | 59 ft. | 39 ft. | 30 ft. | 24 ft. | 20 ft. |
10 AWG | 392 ft. | 196 ft. | 98 ft. | 65 ft. | 49 ft. | 39 ft. | 32 ft. |
Tip: Let's assume the load is 55W. Round up to the nearest load. Assume the distance is 32 ft. Round up to the nearest distance. See the recommended wire gauge to install to eliminate excess voltage drop. Recommended wire gauge is 10AWG.
24V Voltage Drop & Wire Length Distance Chart
5W 0.21A | 10W 0.42A | 20W 0.83A | 30W 1.25A | 40W 1.67A | 50W 2.08A | 60W 2.5A | 70W 2.92A | 80W 3.33A | 90W 3.75A | 100W 4.17A | |
|---|---|---|---|---|---|---|---|---|---|---|---|
18 AWG | 261 ft. | 130 ft. | 65 ft. | 43 ft. | 32 ft. | 26 ft. | 21 ft. | 18 ft. | 16 ft. | 14 ft. | 13 ft. |
16 AWG | 401 ft. | 200 ft. | 100 ft. | 66 ft. | 50 ft. | 40 ft. | 33 ft. | 28 ft. | 25 ft. | 22 ft. | 20 ft. |
14 AWG | 639 ft. | 319 ft. | 160 ft. | 106 ft. | 79 ft. | 63 ft. | 53 ft. | 45 ft. | 39 ft. | 35 ft. | 31 ft. |
12 AWG | 959 ft. | 479 ft. | 240 ft. | 160 ft. | 120 ft. | 95 ft. | 79 ft. | 68 ft. | 59 ft. | 53 ft. | 47 ft. |
10 AWG | 1570 ft. | 785 ft. | 392 ft. | 261 ft. | 196 ft. | 157 ft. | 130 ft. | 112 ft. | 98 ft. | 87 ft. | 78 ft. |
Step 4: Choose Power Supply Based on your calculations, you will want to select a driver that provides 10 – 20% power headroom to the required load as this is critical to support inrush current. Keep in mind; the power supply must be the same voltage as the tape light and accent discs you are using for the project. To see an overview of our power supply compatibility, view our Installation Planning for Tape Lighting with Channels to learn how to build a tape lighting system.
Power Supply Optimization
But wait, there's more to get from your power supply. The diagrams below illustrate ways to break up your runs into multiples, which will ultimately result in additional inches of tape or accent lighting operating from one power supply. In addition to efficiencies gained in materials, the shorter linear runs will also help to maximize the light output potential for a beautiful end effect. For more helpful diagrams, see pages 66-67 in our ILS Catalog.
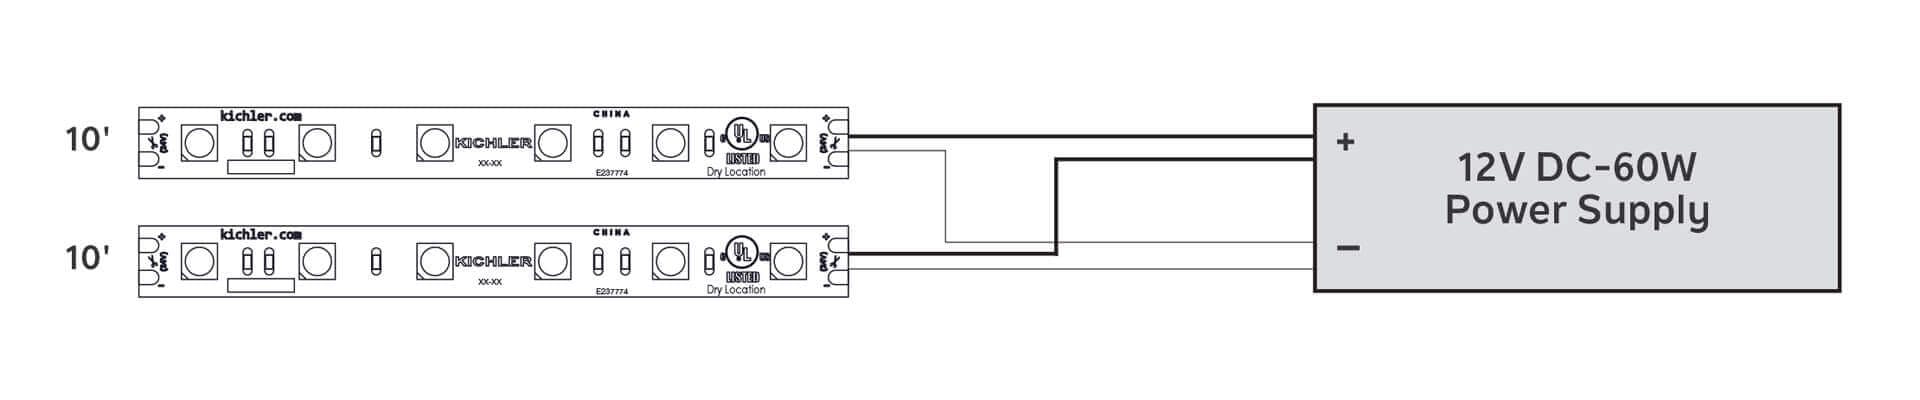
12V DC-60W Power Supply
12V High Output: Max. linear run length is 16', but connecting two 10' lengths in parallel increases total run to 20' using a 60W power supply.
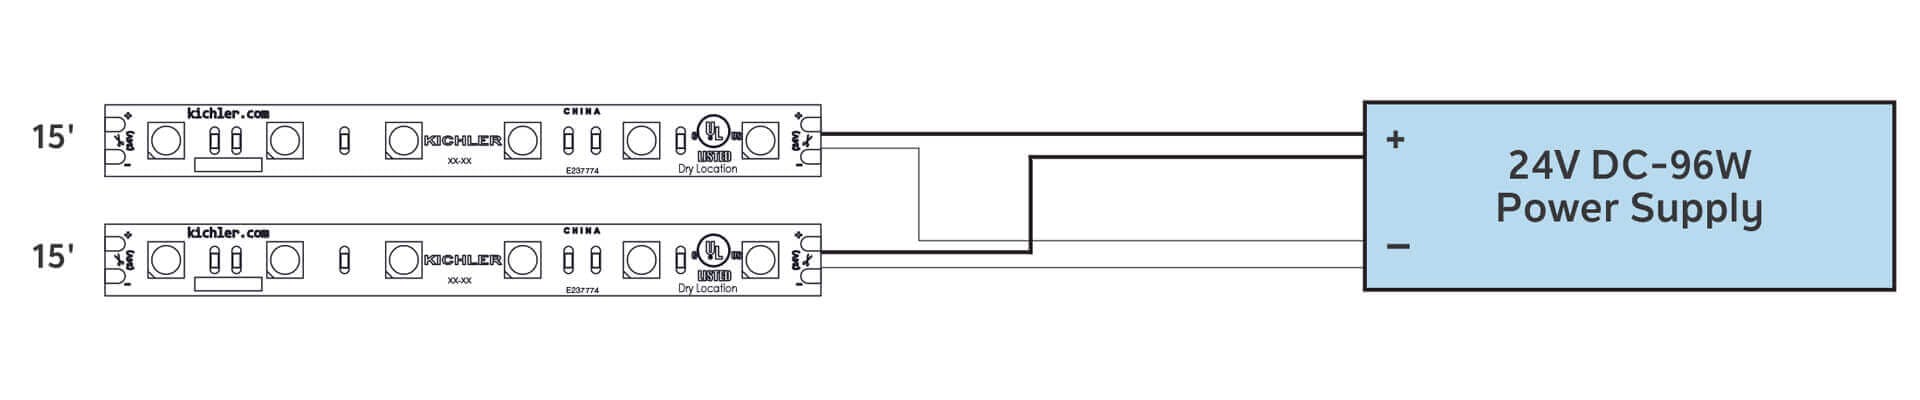
24V DC-96W Power Supply
24V HIGH OUTPUT*: Max. linear run length is 20', but connecting two 15' lengths in parallel increases total run to 30' using a 96W power supply.
*With 8T tape you can run 33' and 67' as a single length, further reducing installation time.
Tip: Center your Power Supply if possible. By centralizing the power supply within your project, you can maximize the total wattage of the power supply. For example, when laying out your wiring plan, consider splitting your installation into smaller runs (multiple independent runs to the driver), so you can take full advantage of the power supply without sacrificing voltage drop. This can help your lighting system perform better than one long run.
Just be sure to always check that your polarity is aligned back to the power supply – consistency in polarity direction is key in powering up your lighting system! In some instances, like kitchen islands, curio, or china, it may work best to plan for an additional, low-watt power supply to better manage wiring to those remote installations.
Incorporating Dimmers
Being able to manage dimming (particularly with a compatible dimmer switch) is key as there is an expectation for lights to dim down to a certain level and do so evenly and with no flicker. Keep in mind LED modules respond differently to various dimmers, so it is important to find a dimmer switch that is compatible with the light source selected.
(ELV) Electronic Low Voltage (Circuit board in dimmer control wavelength):
Reverse phase dimming - features extremely silent operation across the full dimming range. This range is deeper, normally dimming down to 5%, and when paired with a longer life expectancy (backed by warranty) tends to outperform forward phase dimming (sub 10%).
Triac:
Analog
TRIAC dimmers are designed for resistive loads such as incandescent or halogen lights and have a very significant installed base. Narrower dimming range and flicker are usually the two issues found in the Triac dimmer and LED solutions.
(MLV) Magnetic:
Forward phase dimming - the most common dimming method used in the US. No rewiring is needed, whereas the reverse phase often requires rewiring and replacing incompatible existing dimmers. Forward phase dimmers are usually the least expensive option. (We do not currently offer power supplies meant for MLV dimmers)
CL:
Made primarily for LED lamps and features an adjusting wheel. The wheel is under the faceplate and allows the user to ‘tune’ the dimmer to reduce flicker and drop-out.
The “C” in C.L stands for CFL and the “L” stands for LED. The dimmer works to accommodate the differences between these light source types. CL dimmer has internal circuitry that can handle excessive flickering and voltage fluctuations, particularly when large appliances like air conditioners or vacuums are turned on.
LED Driver + Dimmer:
Having a driver + dimmer in one can be quite cost-effective option. It allows you to purchase, stock, and install one item – eliminating the need to install a dimmer separately.
What looks to be a dimmer switch also serves as your power supply connecting directly to your tape or puck supply lead. The driver + dimmer in one also reduces time spent selecting a compatible dimmer.
Direct Wire Dimmable Power Supplies*:
Direct Wire Dimmable Power Supplies*:
Direct Wire Dimmable power supplies get connected to supply wires pulled through the wall - requiring some prior planning for ideal placement. This type of power supply offers voltage control to help manage the power to your LED lighting system – ultimately maintaining the life of the product.
Within this category, there are a few options to choose from - Higher Watt, Lower Watt, and even commercial grade. A greater amount of lighting load can be connected to higher wattage models - maximizing the number of power supplies needed per design. Those with lower wattage are ideal for islands or small jobs to avoid having to run additional wire to remote installations. Most options are ideal for residential installations as they manage to 120V; commercial grade is then best with voltages up to 277V.
Lower Watt:
An economical driver that is ideal for smaller, direct wire, low voltage system projects.
CL and ELV dimmer compatible
Higher Watt:
Ideal for larger direct wire projects such as combining multiple products.
CL and ELV dimmer compatible.
Commercial Grade vs. Residential:
The primary difference when looking to select a commercial grade power supply is its ability to manage input voltage up to 277V. Look for 0-10V dimming as an added feature!
Residential applications are typically 120V.
*All of our Direct Wire Dimmable power supplies include wiring compartments equipped with screws, gaskets, and wire nuts. No additional NEMA enclosure required. These NEMA enclosures include knockouts to allow for wiring in multiple directions. Be sure to utilize the gaskets provided to avoid fraying the wire.
Now that you have everything you need to maximize your power supply, are you ready to explore the options?